Installing GlassFish v2 and v3 Eclipse Plugin
Traditional rituals of installing a plugin depends on using a repository where eclipse can retrieve the available set of packages to update or install. This repository can be an archieve file, a local folder or a server directory on the web, network or anywhere available to access from its URL. In this screenshots, I used Eclipse 3.5.0 and GlassFish 3.0.1
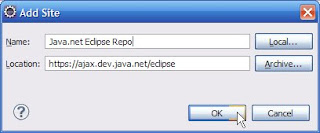
Go to "Help>Install New Software..." then press "Add" button. Then, set the location field to "http://ajax.java.net/eclipse/" and define a name(optional).
First of all, select "Show only the latest versions of available software" in order to select the latest version of plugin; then select the checkbox of "Glassfish Java EE 5 and Java EE 6 support".

Then, press "Next" button, on the next menu.
Finally, select "I accept the terms..." button, press "Finish" to proceed installation.
Get ready to wait for a while (depends on connection speed but generally too much for a 16 MB file)...
Restart your eclipse with clean attribute e.g. "C:\eclipse\eclipse.exe -clean"
To get full control of glassfish application server and develop-deploy applications to server faster, you can integrate it under the "Servers" menu at your eclipse. In your eclipse, open "Servers" menu, right click "New > Server", select Glassfish (v2 or v3) as shown in below. Press "Next"...

Select Java Runtime Environment; i am using GlassFish v3 so directory of JRE 6 is set. Press "Next"...
 Then, make your own administration settings with your admin id and password. You SHOULD check "Preserve Sessions Across Redeployment" to update the application content faster.

Finish..
Thats All...
Go to "Help>Install New Software..." then press "Add" button. Then, set the location field to "http://ajax.java.net/eclipse/" and define a name(optional).

First of all, select "Show only the latest versions of available software" in order to select the latest version of plugin; then select the checkbox of "Glassfish Java EE 5 and Java EE 6 support".

Then, press "Next" button, on the next menu.
Finally, select "I accept the terms..." button, press "Finish" to proceed installation.
Get ready to wait for a while (depends on connection speed but generally too much for a 16 MB file)...
Restart your eclipse with clean attribute e.g. "C:\eclipse\eclipse.exe -clean"
To get full control of glassfish application server and develop-deploy applications to server faster, you can integrate it under the "Servers" menu at your eclipse. In your eclipse, open "Servers" menu, right click "New > Server", select Glassfish (v2 or v3) as shown in below. Press "Next"...

Select Java Runtime Environment; i am using GlassFish v3 so directory of JRE 6 is set. Press "Next"...


Finish..
Thats All...


Comments
Post a Comment
Thx for reading! Comments are appreciated...